To use this guide, you will need to have Symbiostock Pro and any optional plugins/themes already downloaded or purchased. If you want to get the most out of your store, we recommend going for the Symbiostock Bundle which provides you everything you need to launch your store and more. Otherwise, you can download Symbiostock Pro for free and start just with this.
Hosting your own website is a very easy and satisfying thing to do. The benefits are, you don’t have to answer to anyone or be restricted by any platform or infrastructure as you will have you very own WordPress website that you can design and use in any way you’d like. By using this guide, you can get your Symbiostock site up and running within about 30 minutes.
As Symbiostock uses pretty heavy processing for images, you will need a reasonably powerful web host. That’s why we recommend using Amazon Lightsail, which is an easy and cost effective hosting solution (around $5/month). If you already have your own host, or want to host with someone else, that’s totally fine. This guide has been created so that people completely new to Symbiostock and WordPress can get up and running quickly, without issue.
Proceed to Amazon Lightsail and sign up (or sign in using your Amazon credentials). Now we’re ready to get started!
Note: The following guide has been tested to work with Symbiostock Pro and all the premium plugins, including Symbiostock Video. We cannot guarantee that it will process vectors properly.
Step 1: Create a Lightsail instance

a) Choose a region that is closest to your target audience. This will speed up requests.
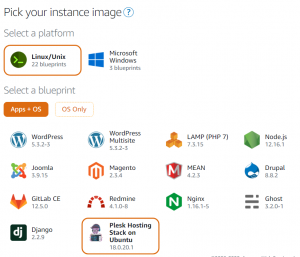
b) Choose Linux as the operating system, and Plesk as your software
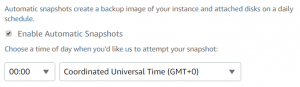
c) Enable automatic snapshots. This will ensure your entire site is backed up by Amazon. There is a very small additional cost to this, but you will then have 7 days of backups in case you ever make a mistake, your site is damaged, or anything else happens. Lightsail backups are called snapshots.
d) Choose your Lightsail plan. You will only be able to choose from those available. You can start with the cheapest plan and upgrade in the future – this is what we recommend, as once you upgrade, you cannot downgrade.
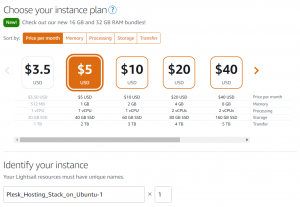
e) Name your instance whatever you like – this does not affect the site in any way.
Your hosting account is ready. Now we can move onto Step 2!
Step 2: Setting up your domain
a) Go to your main Lightsail page and click on the instance you just created.
b) Go to networking. Create a static IP. Select your instance and name the IP to match your instance, though again, this can be anything and will not affect your site in any way.
c) Go back to the instance and again go to networking. Scroll down to the firewall settings and add the following two rules: TCP, 20-22 & TCP, 49152-65535.
d) Go back to your instance. Copy the public IP address. Open a new tab and go to your domain registrar. If you don’t have one, or have never registered a domain before, we recommend going with Namecheap, which is one of the largest and cheapest domain registrars in the world.
e) Buy a new domain or choose a domain you already own. Follow your registrar’s instructions on changing the DNS to point your domain to the public IP address from your Lightsail instance. Generally this means after you have registered the domain, you go to edit the domain’s DNS records in your registrar, and where you see their IP address, you change it to your Lightsail one.
Step 3: Setting up your Hosting
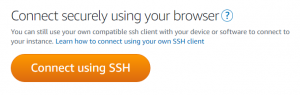
a) Now that your domain is all ready to go, go back to your Lightsail instance, click on it, and connect using SSH. You may have to wait a minute or two if you just created it.
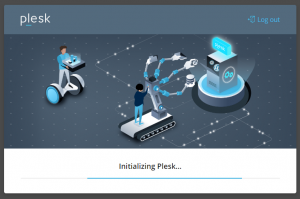
b) Follow the instructions to access Plesk and to get one time login link (sometimes you need to resize the window to see the cursor). If there are any other instructions, follow those too.
c) Get the one time login link, highlight it, and copy it either directly or using their clipboard icon.
d) Close the SSH window.
e) Open a new tab and paste the link there. Ignore any SSL warnings and proceed anyways.
f) Follow the Plesk instructions to set it up.
g) Create a new domain in Plesk and add the new domain you just pointed to Lightsail. Create a username and password for that domain.
h) Enable Let’s Encrypt/ free SSL for your domain. Enter your email address.
i) Once your domain is created, go to it within Plesk and click on PHP Settings. Within that, change the memory limit to 256, the max execution time to 3000, the max input time to -1, post_max_size to 20, and the upload max filesize to 20.
Your domain is now ready and hosted! Time for Step 3.
Step 4: Install WordPress
a) Let’s add WordPress. Click on applications within Plesk and install WordPress. Enter your administrator username and password and the name of your store. Install.
b) Now let’s visit your website by going to domain.com/wp-admin where domain.com is your new domain.
Note: If you get a database connection error, do this: Go to Plesk > Files. Click on your main folder which should be httpdocs, and then click on wp-config.php. Scroll down until you find the db_user and db_password fields. Copy the password which is within the single quotes. Now click on databases within Plesk and go to User Management. Click on the user and enter the password you just copied into the password and confirm password fields. Click OK. Then try to go to the admin page again on your domain, and it should work.
c) Log into your WordPress admin panel using the username and password you created when installing WordPress. We’re almost done!
Step 5: Install Symbiostock and all your Symbiostock Plugins
a) Use any FTP program (if you don’t have one, get FileZilla which is free). Create a new FTP connection in it under site manager. Add your domain as the host, make sure the protocol is FTP (not SFTP), logon type normal, and enter the username and password you created when you added your domain to Plesk. If you don’t remember this, just go back to Plesk, go to your domain within it, click on FTP access, then your username, and set a new password there. Enter that same password and username in the FTP program and connect.
b) If you purchased Symbiostock Express, navigate to /httpdocs/wp-content/themes within the FTP program. Unzip your Symbiostock Express file on your computer, and upload the entire symbiostock-express folder into the /httpdocs/wp-content/themes folder via FTP.
c) Navigate to /httpdocs/wp-content/plugins within the FTP program.
d) Unzip every one of your plugins just like Symbiostock Express and upload them all into the /httpdocs/wp-content/plugins folder on FTP. Upload the entire folders for the plugins.
e) Wait for these plugins to all upload. Do not close your FTP program or browse your WordPress site until this is done.
f) Now that the uploads are complete, go back to your WordPress admin interface > Plugins, and enable Symbiostock Pro. Follow the prompts to install Symbiostock Lite then WooCommerce. Once they are all installed and enabled, you can now enable all your other optional Symbiostock plugins.
g) If you purchased Symbiostock Express, go to Appearance > Themes, and enable Symbiostock Express.
h) Go to Symbiostock > Settings > System and copy the processor cron job command in the text box. Go to your Plesk admin interface and click on Tools and Settings > Scheduled Tasks (cron job). Click add task. Choose run a command and paste the Symbiostock processor line into the command box. Under run, choose cron style, and in the text box paste * * * * * (5 stars with spaces in between). Click OK.
Congratulations! All your plugins are now installed and activated, and Symbiostock is ready to go. You’re ready to use Symbiostock to sell your media. Follow our 3 minute guide via the link within WordPress to get started. Welcome aboard!